Add/Remove Gmail Labels using Indy 10 in Delphi

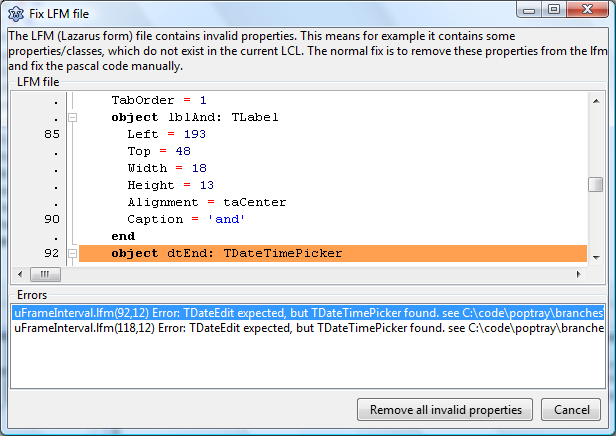
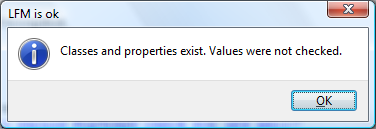
According to support threads, Indy’s TIdImap4 supports fetching Gmail labels but doesn’t have support built in for adding and removing labels. I’m still working on figuring out how to fetch and read the fetched labels, but by using the SendCmd function to manually send the IMAP commands I got adding and removing labels working. So I thought I’d share that code:

function AddGmailLabelToMsgs(const uidList: TStrings; labelname : string) : boolean;
begin
  try
    if HasCapa('X-GM-EXT-1') and (uidList.Count > 0) and (labelname <> '') then begin
      IMAP.SendCmd(ImapCmdNum(),'UID STORE '+uidList.CommaText+' +X-GM-LABELS ("'+ labelname + '")',['OK','BAD','NO'], true);
      Result := IMAP.LastCmdResult.Code = 'OK';
    end else
      Result := false;
  except
    on E : Exception do
     begin
       //Dialogs.ShowMessage('Exception class name = '+E.ClassName);
       //Dialogs.ShowMessage('Exception message = '+E.Message);
       Result := false;
     end;
  end;
end;

At the heart of it, I am using Indy’s SendCmd function to manually send the command. It was a little tricky figuring out how to use this function since documentation and examples are a little scarce. The first parameter is a sequence number so that the response can be matched up with the command. Second is the remainder of the actual command. Third parameter is what responses to look for to know this command is “complete”, and the fourth is whether to look for a single line response or multi-line response.

I also have some commented out exception handling that was helpful to debugging when my SendCmd wasn’t formatted correctly, but is neither needed nor useful for production code.

Remove label is basically the same thing but with a minus sign:

function RemoveGmailLabelFromMsgs(const uidList: TStrings; labelname : string): boolean;
begin
  try
    if HasCapa('X-GM-EXT-1') and (uidList.Count >0) and (labelname <> '')  then begin
      IMAP.SendCmd(ImapCmdNum(),'UID STORE '+uidList.CommaText+' -X-GM-LABELS ("'+ labelname + '")',['OK','BAD','NO'], true);
      Result := IMAP.LastCmdResult.Code = 'OK';
    end else
      Result := false;
  except
    Result := false;
  end;
end;

And here’s the helper functions, minus the global/class/whatever variables:

ImapCmdNum() generates a sequence number for the IMAP transaction, essentially a replacement for NewCmdCounter in IdImap4, since it’s a protected property and client code can’t use it. At first I tried using “A1”, “A2”, etc. but it turned out that using a C prefix, “C1″, C2”, etc. like Indy was important for using Indy to process the response when I got into debugging why things weren’t working right at first…but now I’ve completely forgot exactly where it goes wrong if you don’t use a C.

function ImapCmdNum(): string;
begin
  Result := 'C'+IntToStr(cmdNum);
  inc(cmdNum)
end;

And HasCapa() is a function I added to make sure that the Gmail capabilities are actually available before trying to set/unset labels…Might not be totally necessary, but it seemed like a good idea. Under the hood, I just used Indy’s built in Capability function that calls CAPABILITY on the server, with a little caching so I wouldn’t need to do this more than once per session.

function TProtocolIMAP4.HasCapa(capability: string) : boolean;
begin
  if (capabilities.count = 0) then begin
    IMAP.Capability(capabilities);
  end;
  Result := (capabilities.IndexOf(capability)<>-1);
end;

How to Use Indy 10 Imap Intercept function for Logging

It took me a while to track down enough information to figure out how to use Imap.Intercept to log raw IMAP client/server communication to troubleshoot an SSL account issue, so thought I’d share a basic code snippet on how to have IMAP log to disk the communications.

var
idLogFile1 : TidLogFile;
begin
IMAP := TIdIMAP4.Create(nil);

idLogFile1 := TidLogFile.Create(nil);
idLogFile1.Filename := 'C:\temp\imaplog.txt';
idLogFile1.active := True;

IMAP.Intercept := idLogFile1;

//...
end;

Log4D Basic FileLogger Example

Since there is lacking on “getting started” documentation for Log4D, I thought a basic example might be helpful to others who might be intimidated about getting started with logging to a file in Delphi. Log4D is very simple, and similar to other Log4J related logging packages but lacks basic “getting started” documentation.

I used XE4 Starter for this. At the time of this writing, I and others have submitted some patches to fix the compile errors in Log4D affecting XE4, but they have not been merged in yet. For the quick fix to make it compile in whatever recent version of Delphi you have, see my previous post, my previous post.

First, create a project. I created a VCL application project for this example, because I’m not writing console applications so it’d be easier to copy and paste from 😉

Open the .dproj file (right click on the .exe name in the Project Manager and select “view source”) and add the highlighted lines:

<pre>
program Log4DbasicExample;</code>

uses
Vcl.Forms,
Log4D,
Unit1 in 'Unit1.pas' {Form1};

{$R *.res}

var
Logger : TLogLogger;
begin

TLogBasicConfigurator.Configure;
TLogLogger.GetRootLogger.Level := All;
Logger := TLogLogger.GetLogger('myLogger');
Logger.addAppender(TLogFileAppender.Create('filelogger','log4d.log'));

Logger.Debug('initializing logging example program');

Application.Initialize;
Application.MainFormOnTaskbar := True;
Application.CreateForm(TForm1, Form1);
Application.Run;
end.
</pre>

When you run this application, it will create a log file called log4d.log in the directory the .exe file is in. Good enough for quick logging and debugging. Not adequate for production code.

Anywhere else in the project you need to log something, now it’s easy. I added one button to my VCL form, and double clicked the button to add an onClick handler, and then updated my VCL form unit as follows:

unit Unit1;

interface

uses
  Log4D, 
  Winapi.Windows, Winapi.Messages, System.SysUtils, System.Variants, System.Classes, Vcl.Graphics,
  Vcl.Controls, Vcl.Forms, Vcl.Dialogs, Vcl.StdCtrls;

type
  TForm1 = class(TForm)
    Button1: TButton;
    procedure Button1Click(Sender: TObject);
  private
    { Private declarations }
  public
    { Public declarations }
  end;

var
  Form1: TForm1;

implementation

{$R *.dfm}

procedure TForm1.Button1Click(Sender: TObject);
begin
  TLogLogger.GetLogger('myLogger').Debug('Button 1 clicked!');
end;

end.

If you’re doing a bunch of logging in one part of your code, you probably don’t want to use the chaining syntax because calling GetLogger repeatedly is unnecessary overhead. Instead store the Logger in a variable:

procedure TForm1.Button2Click(Sender: TObject);
var
  Logger : TLogLogger;
begin
  Logger := TLogLogger.GetLogger('myLogger');
  Logger.Debug('Button 2 clicked!');
end;

Well, there you have it. Basic, just enough to get started example. Because next time I want to add logging to a different project, I’m sure I will have completely forgotten how to do it and what and where I added my code.

File-Logging in Delphi

I wanted to do some quick logging to help me understand some code flow in Delphi. But having the Starter Edition of Delphi was crimping my style! Starter Edition doesn’t include the Event Log Viewer to see the output from OutputDebugString() while running in the debugger.

So I kept coming back to “I really just need to get over the learning curve and set up a ‘proper’ logging tool like Log4J”, a tool I’d used for Java projects in times long past. StackOverflow suggested Log4D and Log4Delphi as good possible candidates.

After reviewing both packages, I decided to go with Log4D.

Log4D seemed a bit simpler in that everything you need for basic logging is in one .pas file and one .inc file. I can see advantages both ways as a developer, but for just get me some logging quick, only having to add two files rather than a handful, and only needing one new unit in the uses statement simplifies some things.

Neither one had been updated in the last few years, so when you’re talking about “make this compile in a current version of Delphi” it looked like similar level of work.

Log4Delphi claims to be “loosely based on” Log4J. Log4D claims to be a direct port of Log4J.

Log4Delphi appears to be fairly well documented, whereas Log4D has almost no documentation. And while usually I prefer to go with the well-documented version, I felt like the simplicity of one file would make it worth seeing if I could muddle through the lacking documentation to make Log4D work. A few Delphi experts on StackOverflow swear by Log4D.

There were two compile errors I had to fix to make Log4D compile on XE4:

The IFDEF around Contnrs is missed by newer versions of Delphi, so you need to add {$DEFINE DELPHI5_UP} to the end of the .inc file (or in the .pas file works too). And ShortDateFormat needed to change to FormatSettings.ShortDateFormat

That’s the bare minimum fix, a better fix that maintains backwards compatibility isn’t a whole lot harder See my StackOverflow Discussion here about fixing the IFDEF so “and above”. And the ShortDateFormat issue, just needs another IFDEF around the FormatSettings for XE+.

The only basic “how to get this up and running” example of Log4D I could find online was this one blog entry. It needed a couple changes to compile (“Trace” wasn’t one of the log levels in the downloaded Log4D package). And then a little more puzzling together from the code and documentation for Log4Delphi and Log4J to make a file logger. I’ll write more about those changes in my next post ;-).

How to use the Basic Primitives Org Chart Tool

As I mentioned in my previous post, Basic Primitives is a powerful tool for making Org Charts for your website. I thought it would be useful to document a little bit how to use the Basic Primitives Org Chart tool, because the examples weren’t quite the tutorial I was hoping to find.

So, starting with a simple example of something I needed for my project, I wanted to change the chart’s orientation from top to bottom to left to right. I started by searching the reference guide for orientation. I found it was a part of the primitives.orgdiagram.Config class.

So far, not much on how to use it though. Clicking on orientation type takes you to a more detailed explanation:

Disappointingly, that’s a pretty terse explanation. Ideally, it would explain all the different choices, where to set this property, and have a code snippet to show you the synax. Some defaults in this document are linked to their choices. This one is not.

Searching the page for OrientationType does yield promising results for what the possible values are at least:

The best looking match is:

There’s also a close sounding match “primitives.text.TextOrientationType” however, the descriptions reveal that option is for changing the orientation of the text, not the chart.

So, now, how to use the information we’ve found from the reference guide?

If you go to the “How to Use” section, there’s a list of examples. You could really start with any of them, but I’ll pick the “First organizational chart”. On the plus sides, these examples are all editable, so you can experiment. On the down side, if you make a syntax mistake, the whole chart disappears and it doesn’t tell you where your mistake is.

So the important parts here are where the global options variable is initialized, and where they use it.

Initialization:

var options = new primitives.orgdiagram.Config();

this is given in the example. You’ll notice the variable options is of the type primitives.orgdiagram.Config, like we saw in the reference guide above. So this variable is the one you need to use to change any *global* configuration item that is in that same section of the reference guide.

Now skip down near the end of the example:

options.rootItem = rootItem;
options.hasSelectorCheckbox = primitives.common.Enabled.True;

These two lines change a couple of the global configuration options. So, to add another global option, you just need to add another line of code before or after these two lines, adding your new option.

Go back to the beginning of the reference guide, jump to the section on primatives.orgdiagram.config again, everything under the word “properties” here is a property of options that can be set:

The correct value to use is a little trickier in this particular case. The documentation showed an example of the default being primitives.orgdiagram.OrientationType.Top, however, the documentation shows the possible values for Orientation under a heading called primitives.common.OrientationType. Notice anything different about the package naming? Yeah, that’s a little confusing, and I ended up with a blank diagram a couple times because of this.

Looking at the source code for the enumeration, it appears to be a simple documentation error, that the comment was not updated when the package name was changed for whatever reasons. Here’s the definition in the source code:

/*
Enum: primitives.common.OrientationType
Defines diagram orientation type.

Top - Vertical orientation having root item at the top.
Bottom - Vertical orientation having root item at the bottom.
Left - Horizontal orientation having root item on the left.
Right - Horizontal orientation having root item on the right.
*/
primitives.orgdiagram.OrientationType =
{
Top: 0,
Bottom: 1,
Left: 2,
Right: 3
};

Yep, I’m sure you’ve all seen code like that before. Anyway, just use OrientationType defined in orgdiagram, because that’s what the code says, and what works. And if you find some other property you want to set, and it’s not working, check the package name in the source code to make sure it’s right.

So our working line of code to change the orientation becomes:

options.orientationType = primitives.orgdiagram.OrientationType.Left;

And you just have to put that with the other global options (technically, other places are ok too, but to keep things simple, leave all the options in one place.

If you go back to the orgdiagram.global properties list at the beginning of the documenation,

(there’s more than fit in this screenshot), any of these are set following the same formula. Orientation Type is not the only enumeration incorrectly documented. graphicsType isn’t defined in the documenation at all. Just search the source code for the possible enumeration values. Theres no apparent consistency about whether things are under common or orgdiagam, so just look up what’s in which spot, unless you start to notice a pattern I missed.

options.graphicsType = primitives.common.GraphicsType.Canvas;
options.pageFitMode = primitives.orgdiagram.PageFitMode.PageHeight;

and so forth.

A couple of other options I ended up changing for my diagram included:

options.connectorType = primitives.orgdiagram.ConnectorType.Squared;
options.hasSelectorCheckbox = primitives.common.Enabled.False;
options.minimalVisibility = primitives.orgdiagram.Visibility.Normal;

As a footnote, changing the template around, because we didn’t need pictures next to the roles (since we only showed names for board members on our chart) was a bit more complex and requires structural changes to the javascript. I wouldn’t recommend it for javascript/jquery beginners unless the demo one is really close to what you need. But if you’re a seasoned user of javascript, it’s quite doable.

In Search of An Org Chart

Another project I’ve been working on recently was an online org chart to show the leadership structure for my mom’s club. One of the leaders sent me a powerpoint version of the chart and said “we want this on the website”.

I was anticipating this document would change over time, as new roles are created or subdivided and old roles are retired, so I wanted to make the update process straightforward and quick, so I wasn’t too keen on using an image for the chart.

My first thought was to use Google Orgchart, as it’s super-easy to set up, and I could have the whole thing done in five minutes or so, and there initially appeared to be a section on customizations. But then when I started digging into the options, it turns out there’s no option to change the orientation to go left to right instead of top to bottom, which ended up being a deal-breaker. To illustrate why, here’s a demo of what Google Orgchart’s output looks like with a shallow but wide tree:

In reality, there are 2-5 coordinators under each director role, and a few of those have as many as 3 assisting roles beneath that, so the actual chart would have been much wider. I just wanted to show you how having horizontal labels on a wide chart without putting children far enough down to scrunch the previous level results in a hard to read chart. For a deep hierarchy with few nodes, Google Orgchart seems like a great simple tool, but for a shallow hierarchy with many nodes per level, it just wasn’t the right tool.

So I started looking into alternatives to Google Orgchart. There was absolutely nothing with the same level of simplicity. At one point I even looked into how hard would it be to just export the powerpoint chart to HTML. Oh, but it turns out Office took “export to html” out of the features list in Office 2010, so I would have had to reinstall Office 2003, or experiment with a rather complex workaround, just to evaluate whether that would be a feasible choice.

In the end I kept coming back to suggestions that Basic Primitives looked like the right tool for the job. It’s demos clearly showed it was capable of a horizontal layout, but unfortunately, their “how to use” section completely neglected to give a demo on how to change that option. The tool provides lengthy documentation on all the properties you could possibly set, however, the “reference guide” looked like a machine-generated documentation, and I felt like the “how to” section could have been a little more helpful at explaining how to use the different customization options, rather than leaving that as an exercise to the newbie who has no idea how to use this tool.

It took a a bit of time studying the examples they did provide, and trying to match up how they changed this and that to where in the reference guide that item was documented to figure out how to decipher the reference guide. But in the end, I was successful in creating the org chart I needed using this tool.

Here’s an image of what the layout ended up looking like using the basic primitives tool with custom (simplified) layouts for each role. The colors are designed to coordinate with the site ;-).

In my next post I’ll spell out a little more about how to use Basic Primitives because it’s a great tool, but the documentation isn’t very newbie friendly.

Installing Indy9 from Source Code

I’m finally working on getting Delphi 7 set up on my Win7 x64 machine. I think it’s been over a year since I last did this on my Vista machine or my Win7 x32 netbook, so my mind totally went blank trying to remember how to install the lastest version of Indy 9.

I already had pulled the code from Indy’s SVN server and been able to transfer that from the old machine, so I was one step ahead there.

I pulled up the “ManualInstall.txt” document in the Indy source directory and tried to follow the directions, only to find it didn’t work. At first it looked like it was a permissions issue, I needed to be running a batch file called fulld7.bat from a command line running on elevated privileges to get the script to run without errors, however, even after sorting all that out, when you get to the step of Installing the *.bpl, even after you’ve correctly remembered which one is the right menu option install such, it just doesn’t work. Complains about a missing file (that just doesn’t seem to exist in the provided repository or compiled files directory).

Well, after much fiddling and trying to figure it out on my own, since the internet had no solutions, it turns out, those directions probably are obsolete, and doing it the way that actually *worked* was much easier…just not obvious if you haven’t been working with Delphi recently.

In the Indy 9 directory from the SVN, there’s a .DPK package file for each delphi version. So, since I’m using Delphi 7, double click Indy70.DPK, it opens in Delphi with a package window visible displaying a list of all the files. At this point you’re two clicks away from a working Indy install. Click “Compile” and then “Install” on the package window, and dismiss the dialogs that confirm those steps work, and suddenly Indy is on the component toolbar without even restarting Delphi.

So there you have it. I’m thinking documenting the steps on installing this that work will be helpful, because by the next time I get around to trying to install Indy on a new machine, I almost certainly will have forgotten how you install it, since you do it once and never touch it again, and odds are good that it will need re-installing after a hiatus where I haven’t touched Delphi in a while period and can’t remember off the top of my head the difference  between installing a component and installing a package, since that’s very delphi-specific terminology.

Pattern Block Designer

I’ve started a new project recently. A pattern block designer written in Java 7. Yes, in spite of all the other projects I have yet to start ;-).

My mom gave my son a box of mis-matched pattern blocks that were left over from her classroom. Anyway, he’s not really old enough to “get” making designs on his own yet, but I figured he loves puzzles and matching shapes and colors isn’t too hard for him, so I started looking for some designs online of concrete objects drawn in pattern blocks, like a train, for example, since he’s really into trains.

But while the first site I found a bunch of animal designs had nice high quality printable PDFs, the second site (which had some cool designs like rockets and trains) had a word document with upscaled screenshots from a java applet. It was quite low resolution (like 32 pixels per inch instead of 300 pixels per inch…and no amount of anti-aliasing is going to make up for that), and the geometry of two of the shapes was just a little bit off for the sake of convenience. It just didn’t look very good printed. And there weren’t a lot of other free or instant-download alternatives.

So I decided to redraw a couple of those designs in Corel Draw, and set out creating isometric guidelines and measuring all the real pattern blocks with a ruler and compass to make sure I had the scale correct and everything before I created shape templates. And while the finished product didn’t look bad, I kept getting frustrated with how much simpler it “ought to be” to do this, mentally designing how it ought to work.

So that’s pretty much my inspiration for deciding to start this project. And just for fun, here’s one of my corel draw animal designs as a low quality gif image…and you can see a couple of my points of frustration trying to get the geometry to line up perfectly…even with the “snap” options in corel draw.

Upgrading from Indy9 to Indy10

Translating the source code to Indy10 only took about an hour. It would be nice if there were a more comprehensive upgrade guide, rather than having to google one piece after another to figure things out, and pulling up grep to search the source code to figure out what include is needed now.

Here’s a summary of a few of the changes I encountered needing (hope this helps someone save some time!)


  • POP3.MaxLineLength becomes Pop.IOHandler.MaxLineLength (watch out for IOHandler being null though)
  • wsOK moved, add uses IdIMap4
  • Pop3.Connect(Timeout) breaks into two commands, Pop3.ConnectTimeout := TimeOut; Pop3.Connect()
  • StoredPathName not found. Change TIdAttachment to TIdAttachmentFile
  • POP.Capture(Dest); moved to POP.IOHandler.Capture(Dest);
  • Signatures of OnWork and OnProcessWork changed. Change const Integer param to Int64 (not const)
  • EIDSocketError not found. Import/uses IdStack
  • CommaSeperatedToStringList not found. Add import/uses IdGlobalProtocols
  • TIdText not found. Add import IdText

A few articles about porting to Indy10:
http://conferences.embarcadero.com/article/32160
http://www.indyproject.org/docsite/html/MigratingIndy10.html
http://www.indyproject.org/docsite/html/ChangesObjectHierarchy.html

But when all was said and done, that didn’t fix my disconnect problem. Looking a little more into why it was crashing disconnecting, I changed closing the connection from being conditional on the correct response to unconditional, and instantly, things start working and I have email showing up in my client! Yay.

Debugging Forms Ported from Delphi to Lazarus

One problem I was encountering in converting a few of the Delphi forms into Lazarus forms is that after I got to the point where everything was compiling, and even the point where I could run the application and bring up the main window, I still couldn’t successfully edit the forms properly.

I’d open the converted LFM (Lazarus form) and it would only display in code-view and not the “Unit View” where you can visually edit the UI. Go to View->Toggle Form/Unit View, which should cause it to switch to Unit view, and nothing would happen. Not so helpful. Or one time the option was greyed out entirely. With no real clear hints about why.

Clearly, something was wrong, and not a lot of feedback about what. I was unsuccessful in finding any guides online about how to troubleshoot such, so it took a bit of tinkering and guessing. So here’s what steps were actually useful in solving the problem.

1. Make sure all expected dependencies are listed in the Project Options (under Compiler Options->Paths)

First, since the form was fully working in Delphi before converting, there’s a very good chance the problem is an unknown property name or an object of an unknown type. This is probably not a totally unfamiliar to a Delphi developer who’s ever had a missing dependency on a form before. But since you’ve probably already done that or you wouldn’t be still trying to fix it…

2. Tools -> Check LFM in Editor

This brings up a window that checks for various errors in the LFM. If anything is found here, you should definitely fix them. In this example, I’d already replaced TDateTimePicker with TDateEdit in the corresponding .pas unit file, since Lazarus doesn’t have quite the exact same component available. But the form needed to be updated too.

Mind you, that wasn’t enough to make the form actually load. But now at least the form check has fixed all the problems it can. The wording on the informational dialog that tells you this could probably stand to be more clear, but  if you thought to read the title, that would be a big hint that this isn’t an error message.

In some cases I found it better to edit the fixes I wanted into the file in notepad rather than letting it automatically delete the objects/properties.

3. Make sure the LFM is open and saved, then select File -> Reload

Hmm, that’s interesting, all of a sudden I’m seeing a new error it didn’t tell me about when I first loaded the form.

It’s not the most easy to decipher error message, but essentially it’s the same sort of message you see in Delphi when you try to load a form that uses a component that’s not in the project path correctly. Stream position (presumably either in bytes or characters) is not nearly as helpful as a line number would be. But it did give me enough information to know what I’m looking for. Unfortunately, TabOrder is all over the file, because almost everything has a tab order. So I decided to take the easy way out and just wipe out all the TabOrder properties (Later I’ll recreate the necessary tab order properties using the GUI builder) and be done with it rather than trying to decipher the Stream position.

4. Turn on Lazarus logging

For one stubborn form, the one that was conveniently almost 3,000 lines long (not easy to find the problem by eye!), I found all these other steps were giving me no further errors or hints as to what was wrong. I researched whether there was any way to turn on a debug log or something for Lazarus. Maybe there’s an error happening or bug it’s not telling me about.

So (after some googling) I copied the shortcut for Lazarus from my start menu onto the desktop, added “ --debug-log=c:\temp\lazarusdebuglog.txt” to the run target, and restarted Lazarus from my new shortcut. I tried the menu option to switch the view that failed, quit lazarus to end caching on the log, and looked at the log. The log actually gave me a very good hint what was wrong.

TMainIDE.DoLoadLFM loading nested class TIdAntiFreeze needed by C:\projectpath\uMain.lfm
TMainIDE.DoLoadLFM DoLoadComponentDependencyHidden NestedClassName=TIdAntiFreeze failed for C:\projectpath\uMain.lfm

There were a couple other lines too, but clearly this was a problem. Dependency problem. I searched the lfm in text view for TIdAntiFreeze and quickly located the offending object on the form, which was easy to delete (to be fixed later). After editing that object out and saving, it was able to load in the GUI builder, and fix some of the other more important UI issues.

So hopefully these troubleshooting steps will be helpful to me or someone else down the line having to resolve similar types of problems.